
")
Total Work Hours: 4 Hours

No teaching today, no school for the boys and the house is fully decorated = a full day to work on Journey!!! However, I kept having an adorable furry distraction today and Oscar finally jumped into the van and wanted to help me! That must mean he is thinking I am making progress as he would not get into the van until today. Lol!
Today’s goals:
Pics below show the before views of the targeted area and then after the task was completed. 🙂
Today I really had one goal….get all of those darn side panels out so Friday I can finally remove all the rivets and hopefully have the inner ceiling panels drop easily. The side ones have to come out first before I can drop the ceiling in the way they are set and secured.
OMG! I think I must have drilled out about 200 rivets today. I drilled so many that the inner palm of my right hand was completely swollen by the time I finished. Almost done with that though as once the ceiling is down, then the rivet nightmare should be almost over. I have been through 3 drill bits by now and that is even ensuring to add grease to the end of the bit after every 3-4 rivet removals, which does help extend the life and effectiveness of the bit a lot.
So…here is what I got done today:
- Below is the rear passenger corner of the van with significant damage from someone backing the van into something significant somewhere along the line of the van’s existence. We are probably not putting this panel back in later and will just make and form a new piece of metal of our own that isn’t damaged. Since we will do this, we will make these 2 back corners 90 degrees rather than curved to make the best use of the space once we are ready to insulate and set the wood in place. As with the others, once I removed the panel and then the insulation, there was no rust or other concerns except for the previous damage we already could see and knew about.


2. Below is a pic of the right rear corner with panel removed but with the insulation still in place. Then the second picture is of the lowest panel under the windows down to the floor. That was a doozy to get out between all the rivets, bolts, plus being welded in some spots for some reason and the panel being glued to the rubber on top of the wheel well. I did a happy dance when that piece came off for sure as that one took some muscle and patience! Panels are looking good and clean underneath! Yippee!


3. Next I was able to continue moving slowly toward the cab of the van…working my way forward numbering and removing panels along the way. First pic is of the space right behind the drivers seat and the other pic is of the space that would be behind the passenger seat. One side revealed a brown/tan colored metal and the on the other side, the metal is black….interesting. So, in case you missed the info in a previous post, this van was originally in 1978 a Chassis truck and then somewhere along the line, not too much later, the cargo portion was added at a factory so that is why you may notice the bent metal above the passenger door frame as the back of the cab was cut and removed and made into a van. Looking good, no rust or leakage.


4. Next I moved to the panels above the passenger door space. I removed the speakers that were put there by the previous owner and then was able to remove the whole panel exposing the space above. I would really like to figure out how to utilize some of that space as it is a great nook and cranny. 🙂


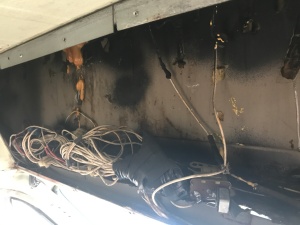
5. Now I have my eyes on the headspace panel above the seats in the cab. I was a little nervous about removing this one as I knew that this is where some leaking has occurred and it had been roughly patched to keep it from coming through into the cab without much success. I didn’t know how bad it was going to be. How perfect it was that when I got to this space, it began to rain which was perfect so I could see where and how much the overhang was leaking. Much to my surprise, it was just very tiny drips and slow at that which means that it wasn’t leaking too badly. All the old caulking on the exterior above the cab is going to be cut out and replaced anyways, but this made it easy for me to caulk from the inside temporarily now that I could see where the points of vulnerability were. Whew! That was a relief. There were a ton of wires up there too so Brian assures me he will teach me what those wires are, we will replace them all and make it alot neater and safer in there as well. I am excited to learn about them and to fix it all.


Only one small panel above the drivers side but I decided to wait until Brian can help on Friday, as it has a lot of light panels and some other switches attached to it. I would like his advice on how to safely manipulate that one before I start tugging on wires and such. Once that was is down, then the ceiling can come down and we can see how that looks!
So, here are pics of the almost completed panel removal step of the interior! I am soo excited!


Thanks for checking in with us and we all hope you have a wonderful Thanksgiving with your families and friends! Be safe and thank you for following us on this adventure with Journey!
Make sure to follow us on Instagram at #JourneyinaVan!
— Owl, Hubby, Hi-Five and Joshy
❤️🦉✌️
